
Integrate with GitLab (OIDC SSO)
After connecting GitLab as the identity provider (IdP) for Kuboard, your team signs in to Kuboard with their existing GitLab accounts, no new Kuboard accounts needed. This page is for administrators: complete the configuration on the GitLab side and the Kuboard side in order.
Audience: Kuboard administrators.
Prerequisites:
- Kuboard is deployed and reachable from your browser (the examples below use
https://kuboard.example.com); - You have access to a GitLab.com account or a self-managed GitLab instance (GitLab's OIDC provider is available on the Free tier; CE and EE both work);
- You are familiar with the OIDC SSO configuration entry in Kuboard.
Configuration Flow
| Step | Where | What to do |
|---|---|---|
| 1 | GitLab | Create an OAuth application, get the Application ID and Secret |
| 2 | Kuboard | Fill in the OIDC settings under System Administration → Settings → System Settings → User Authentication Settings → OIDC SSO, then save |
| 3 | Kuboard | Click Start check and verify the callback URL and the whitelist |
| 4 | Both | Verify login with a GitLab account |
Step 1: Create an OAuth Application in GitLab
Create an OAuth application in GitLab and register it as an OpenID Connect client. Pick the application type that fits your organization — all three work the same way, they only differ in visibility:
| Type | Where to create | Best for |
|---|---|---|
| Group-level (recommended) | Group → Settings → Applications | Only group members can sign in |
| Instance-wide | Admin → Applications → New application | All members of a self-managed GitLab instance (Self-Managed only, requires administrator) |
| User-level | Avatar → Edit profile → Access → Applications | Personal testing |
Fill in the new application form:
| Field | Value |
|---|---|
| Name | Kuboard (any name) |
| Redirect URI | https://kuboard.example.com/api/anonymous.kuboard.cn/v4/oidc/callback |
| Scopes | Select openid, profile, email |
Copy the Redirect URI from Kuboard
The top of Kuboard's OIDC card lists the callback URLs to register (derived from the whitelist) with a Copy button — paste one into the GitLab Redirect URI field instead of assembling it by hand. When users may reach Kuboard through several addresses (public domain, internal domain, a debug port), register one entry per address.
After clicking Save application, the page shows two values — copy and save them right away:
- Application ID — used as the Client ID in Kuboard;
- Secret — used as the Client Secret in Kuboard; it is shown only once at creation time.
Mark instance-wide applications as Trusted
When creating an instance-wide application under Admin → Applications, tick Trusted so members are signed in directly without an authorization confirmation page on first login.
Step 2: Fill In the OIDC Settings in Kuboard
Entry: System Administration → Settings → System Settings → User Authentication Settings → OIDC SSO. Turn on "Enable OIDC Login"; the card then shows a "Before you save, complete these 3 steps" guide (register the callback URL → fill in the two issuer URIs → save and self-check). Fill in the fields:
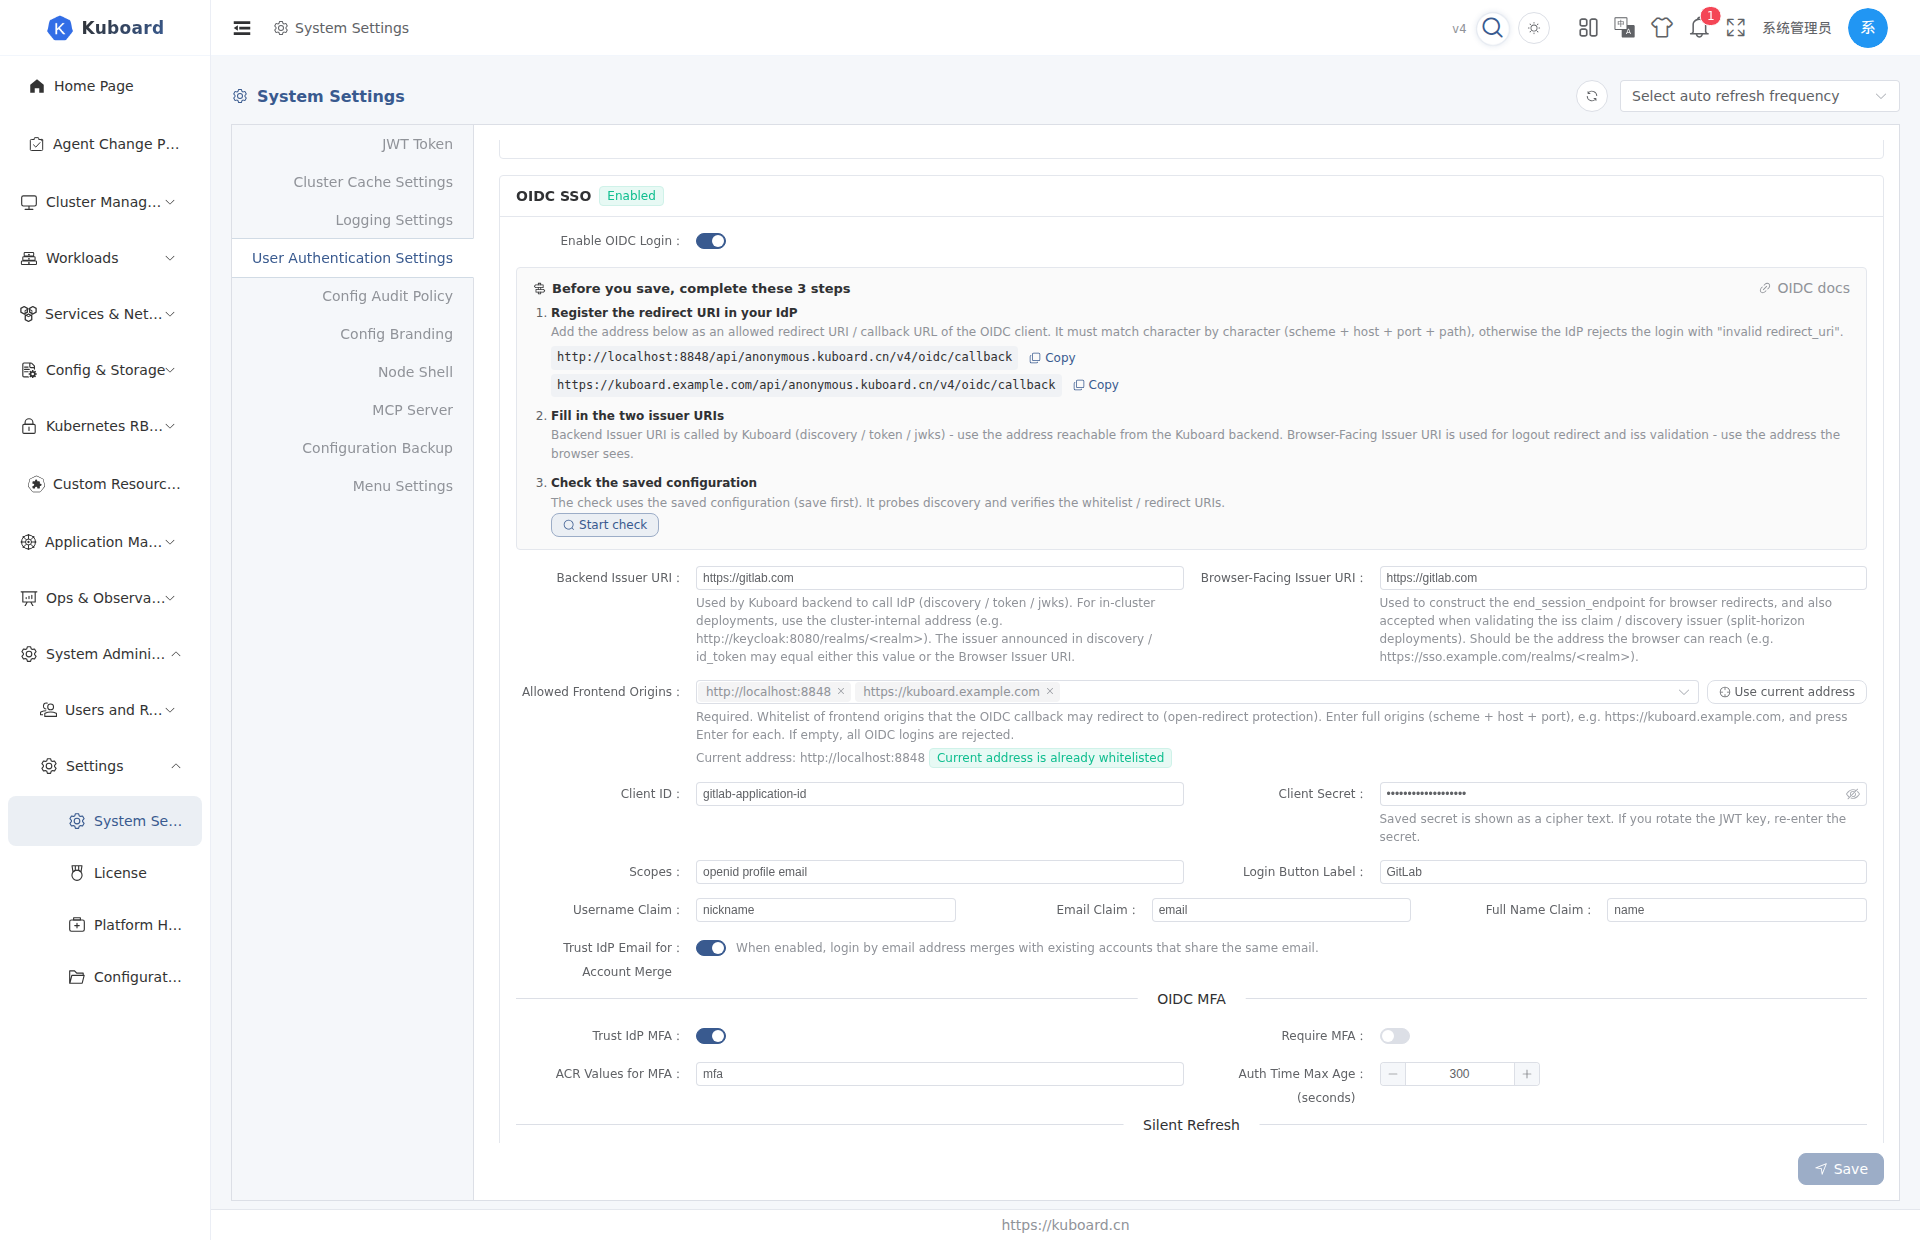
| Field | Value | Notes |
|---|---|---|
| Backend Issuer URI | https://gitlab.com or https://gitlab.example.com | The root URL of your GitLab instance; no /oauth, no trailing slash |
| Browser-Facing Issuer URI | Same as above | Only set a different value when the browser and the backend reach GitLab at different addresses (split-horizon); otherwise keep it the same |
| Allowed Frontend Origins | https://kuboard.example.com | Required; type an origin and press Enter, or click Use current address to fill it in. Use the scheme + host + port you see in the browser's address bar when opening Kuboard |
| Client ID | Application ID from step 1 | |
| Client Secret | Secret from step 1 | |
| Scopes | openid profile email | The default is fine |
| Login Button Label | GitLab | The login button shows "Login with GitLab" |
| Username Claim | nickname | The GitLab username; preferred_username also works (both are issued in the id_token) |
| Email Claim | email | The GitLab primary email |
| Full Name Claim | name | The GitLab display name |
| Trust IdP Email for Account Merge | On | Merges with an existing Kuboard account that shares the same email |
The settings take effect immediately after saving; no restart needed. Whitelist entries are normalized automatically (trailing / removed, host lower-cased, duplicates dropped), and the input shows in real time whether the current address is whitelisted.
After saving, click "Start check": the check uses the saved configuration to fetch GitLab's discovery document once and verifies the whitelist and the callback URL. You should see "self-check passed: discovery reachable, whitelist matches the current address"; also confirm that the callback URL listed by the check matches the Redirect URI in GitLab character by character. Fix what the check reports, save again and re-run it.
Step 3: Verify Login
- Sign out and go back to the login page. With OIDC active, the username / password fields are hidden and only the OIDC option remains.
- Click Login with GitLab; the browser redirects to GitLab for authorization.
- If an authorization page appears on first login, click Authorize (it will not appear for Trusted instance-wide applications).
- You are redirected back to the Kuboard home page — signed in. In Users, filter the "Source" column by OIDC to see the new user.
Pre-create accounts (optional): to assign roles / groups before the first login, click + Pre-create OIDC User on the Users page and enter an email exactly matching GitLab (case-sensitive). After the first successful login, the placeholder is replaced by the real user and the assigned roles and groups are kept.
Read the hint when a login fails
A failed login returns to the login page with an actionable reason, e.g. "the address you use to open Kuboard is not in the OIDC whitelist" or "the IdP rejected the token exchange". If the browser shows a page with only an error code instead, the failure happened before the redirect to GitLab (empty whitelist, or the current address is not registered) — see below.
Troubleshooting
A user has no email or display name after login
GitLab only issues the email claim when the application has the email scope and the user has set a public email address in GitLab. Ask the user to add a public email in their GitLab profile; the login name is taken from the Username Claim and is unaffected.
The id_token failed validation
- Both Issuer URIs must be the root URL of the GitLab instance — no
/oauth, no trailing slash; - If your self-managed GitLab uses a self-signed certificate, the Kuboard backend must trust that certificate, otherwise discovery cannot be fetched;
- When internal and external addresses differ, put the browser-reachable address in "Browser-Facing Issuer URI".
The browser shows an error page (instead of returning to the login page)
These two failures are rejected before the redirect to GitLab:
| What the browser shows | Meaning | What to do |
|---|---|---|
| 503 | OIDC is enabled but the whitelist is empty | Fill in "Allowed Frontend Origins" and save |
| 400 | The current address is not in the whitelist | Add the current address, or visit Kuboard on a registered address |
GitLab reports invalid redirect_uri, or the login page says the IdP rejected the token exchange
- The Redirect URI in the GitLab application must exactly match
https://<Kuboard-domain>/api/anonymous.kuboard.cn/v4/oidc/callback(scheme, domain, port and path all matter); - The Client ID / Secret do not match GitLab (common after renewing the secret with Renew secret without updating Kuboard) — copy the values again and save;
- If needed, confirm the application is not disabled on the GitLab side.